Discovering a leaking house can be a disheartening experience. You can spend hours searching for the source of the leak only to come up empty-handed. Unfortunately, water leaks are a common problem in many homes, especially those with basements. Fortunately, there are steps you can take to identify and fix water leaks in your home. This blog will discuss the common causes of water leaks in homes, how to fix them, and how to prevent further leaks. Read on to learn more about how to solve the mystery of a leaking house.
What to Do When You Discover a Leaking House
If you discover that your house is leaking, the first thing to do is assess the damage. Take note of any visible signs of water damage, including water stains on the walls and ceilings, mould, and warped floors. If you suspect a water leak, locate the source of the leak as quickly as possible. This will help you determine the best way to address the problem.
The most important thing to remember is that water leaks can cause serious damage if left unchecked. It’s essential to act fast to avoid costly repairs down the line. If you’re concerned about the safety of your home, contact a professional to inspect the area and make the necessary repairs.

What Causes Water Leaks in Your House?
There are a variety of factors that can cause water leaks in your house. The most common culprit is ground water entering a home when it is buried underground and having nowhere else to go but inside your home.
In some cases, the source of the leak may be difficult to pinpoint. If this is the case, it’s best to call in a professional to help you identify the source of the leak. A professional can quickly pinpoint the source of the leak and make the necessary repairs.
Identifying the Source of the Leak
The first step in solving the mystery of a leaking house is to identify the source of the leak. This can be a tricky process, as the source of the leak may not be immediately apparent.
Start by looking for any visible signs of water damage, such as water stains on the walls or ceiling, mould, or warped floors. If you can’t find any obvious signs of a water leak, it’s time to start looking for more subtle signs.
Check for any unusual smells or sounds, such as a musty smell or gurgling noises. You may also want to check for any signs of moisture or dampness in the walls, floors, and ceilings. If you can’t find any visible signs of water damage, it’s time to call a professional. A professional will be able to pinpoint the source of the leak and make the necessary repairs.
Common Causes of Water Leaks in Basements
Basements are one of the most common areas for water leaks. This is because basements are usually the lowest point in the home, making them susceptible to flooding.
The most common cause of water leaks in basements is poor drainage. If your basement has no means of diverting ground water away from the home then it will enter the home instead. Water can easily seep in and cause damage.

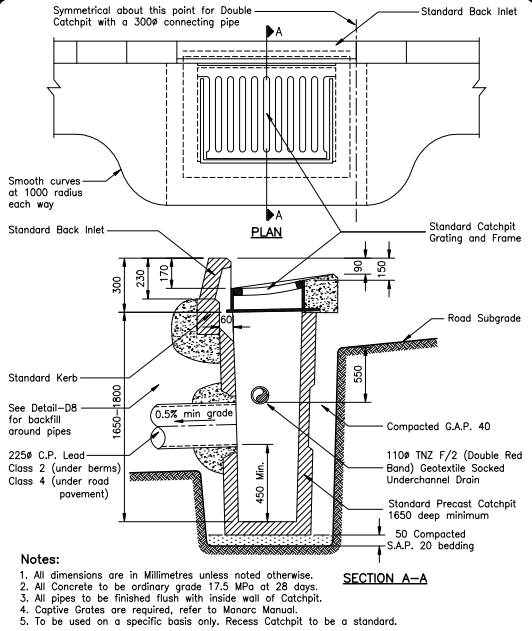
Drainage Subsoil Solutions
If the source of the leak is poor drainage, you may want to consider installing a drainage subsoil system. A drainage subsoil system is designed to redirect water away from the house, preventing it from seeping in and causing water damage.
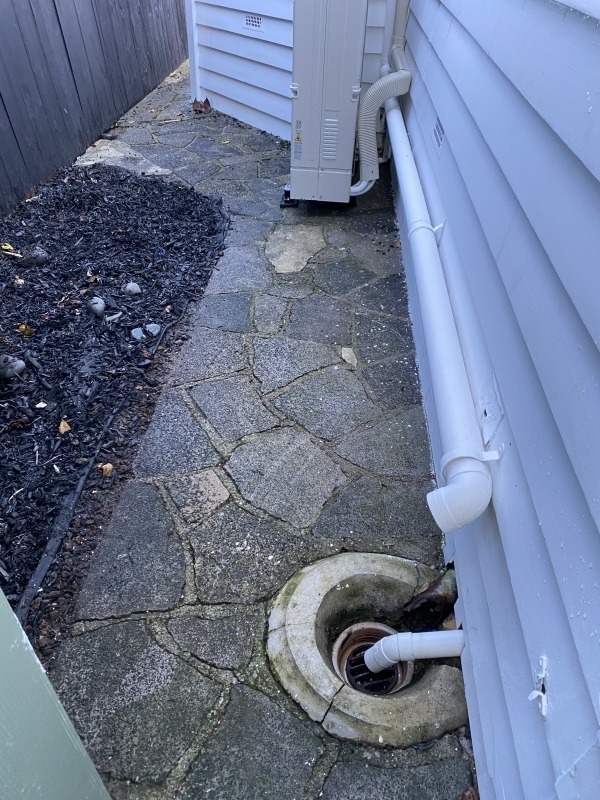
The drainage subsoil system consists of a network of pipes and trenches that are installed around the perimeter of the house. The pipes and trenches are designed to collect and divert water away from the house, preventing it from seeping in and causing damage.
This type of system is relatively lengthy and expensive to install but is the most effective way to prevent water damage long-term. If you’re concerned about the safety of your home, it’s best to call in a professional to install the system for you.
How to Prevent Future Leaks
Once you’ve fixed the source of the leak, it’s important to take steps to prevent future leaks. Whilst all the trenches are open around the home, the drain layers would seal up any obvious entry points to the home such as cracked bricks or holes in the walls. The drain layers also apply 2 coats of waterproof paint as a precaution to prevent any more water from entering the home.

DIY or Hire a Professional?
When it comes to fixing a leaking house, it’s important to decide whether you’ll do the repairs yourself or hire a professional. While it’s tempting to attempt DIY repairs, it’s usually best to call in a professional. This is because water leaks can cause serious damage if left unchecked. A professional will be able to quickly identify the source of the leak and make the necessary repairs.
If you want to get Drainage NZ to look at your house to see what can be done to stop the water form getting in, they offer a free consultation. During the consultation, they’ll inspect your home and provide you with a detailed report on the best way to address the problem.