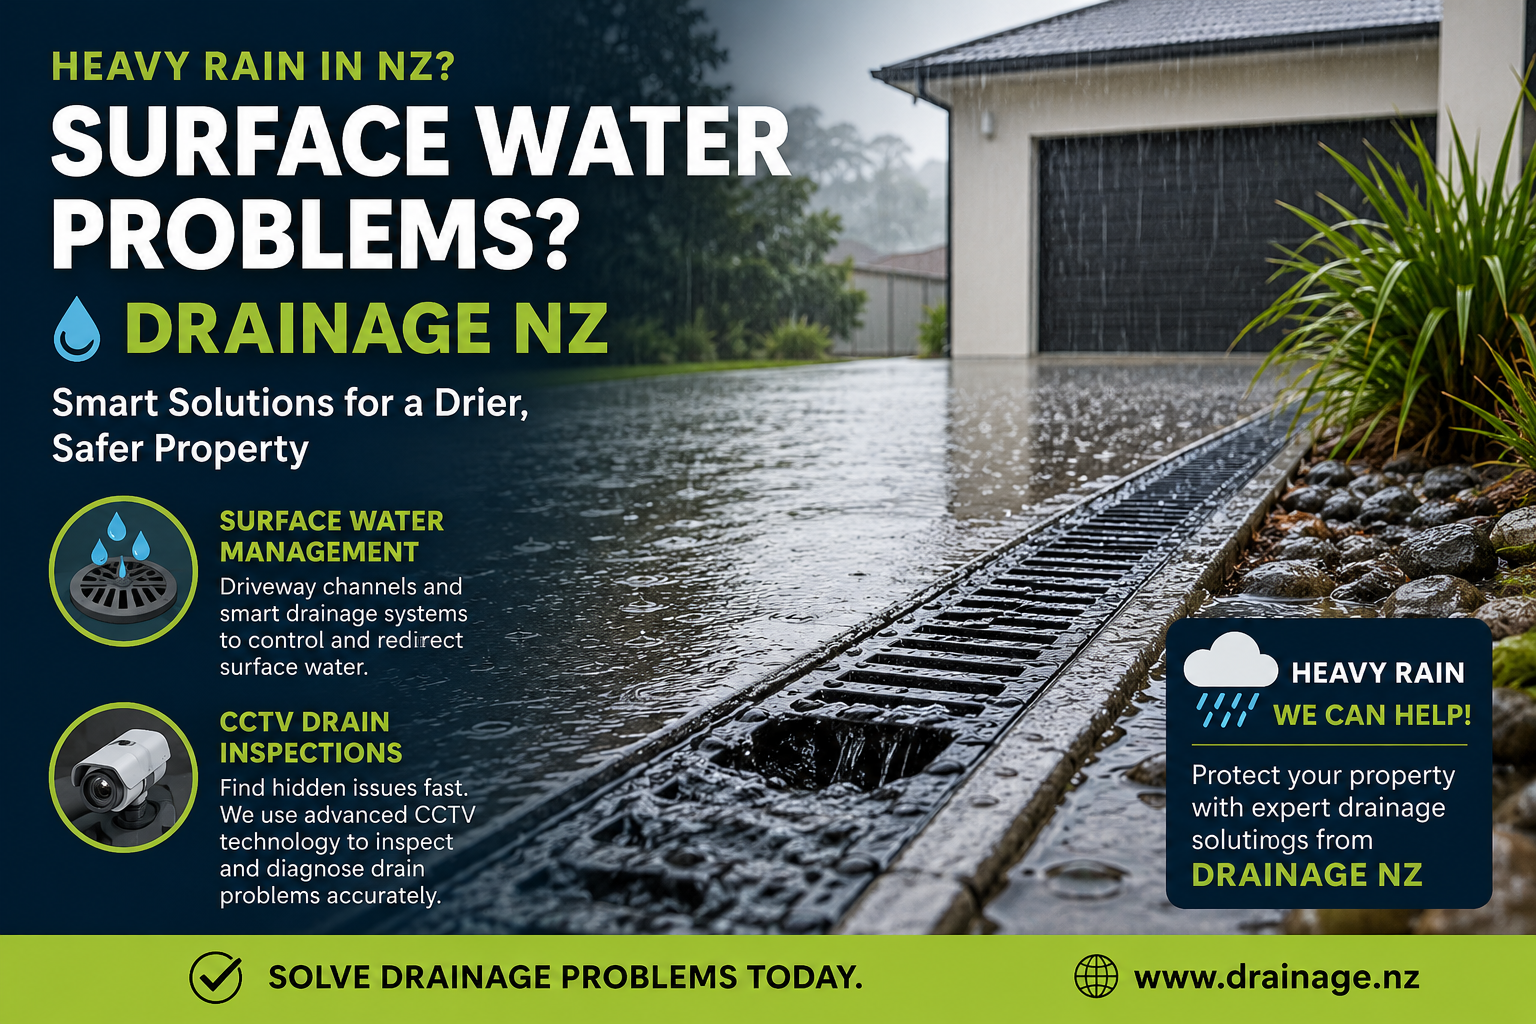
With heavy rain falling across New Zealand today, many homeowners and businesses are experiencing a familiar problem – surface water pooling around driveways, pathways, garages, and buildings. While a little standing water might seem harmless, ongoing drainage issues can lead to property damage, flooding, erosion, and costly repairs.
At Drainage NZ, we specialise in identifying and solving drainage problems before they become major headaches.
Why Surface Water Is a Problem
Surface water occurs when rainwater cannot drain away efficiently. This can happen for several reasons:
Poor site grading
Inadequate stormwater infrastructure
Blocked drains
Insufficient collection points
Increased hard surfaces such as concrete driveways and patios
When heavy rainfall exceeds the capacity of your existing drainage system, water will naturally find the path of least resistance. Unfortunately, that often means flowing toward your home, garage, retaining walls, or neighbouring properties.
Professional Surface Water Management Solutions
Effective Surface Water Management is essential for protecting your property from flooding and water damage.
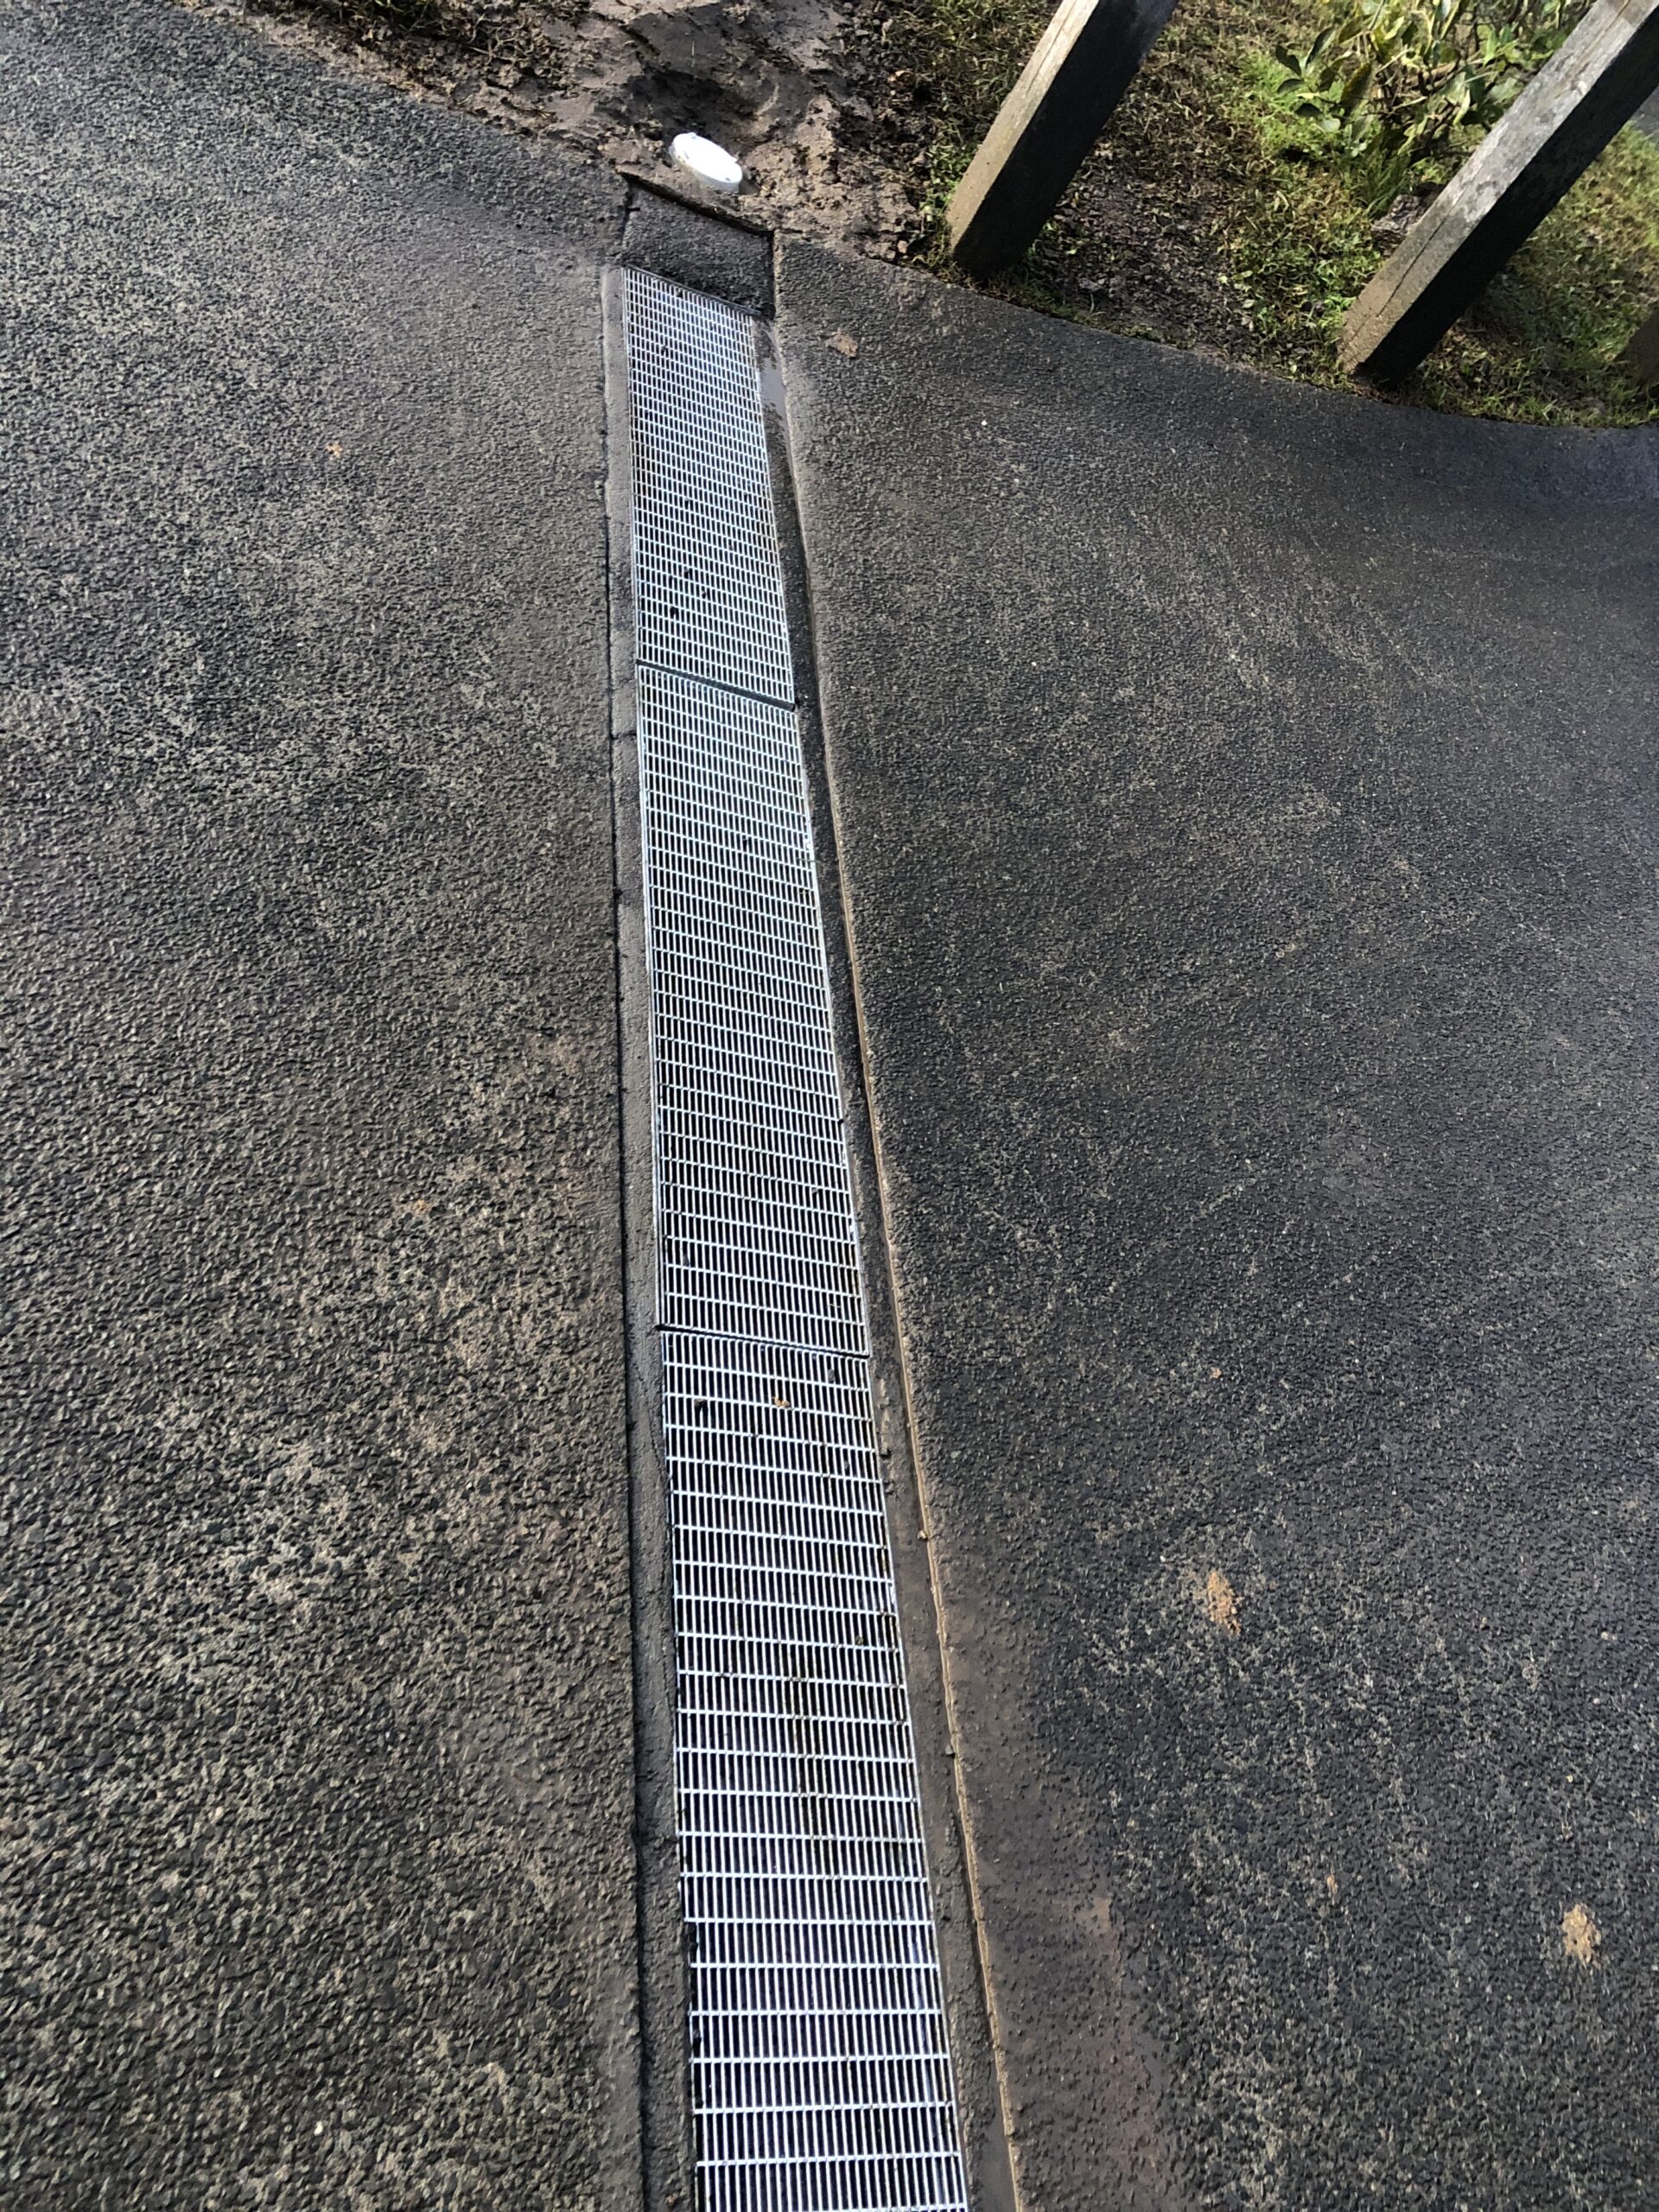
Drainage NZ provides a range of solutions designed to capture, control, and redirect stormwater before it becomes a problem. One of the most effective options is the installation of driveway channels and linear drainage systems. These systems collect surface runoff and safely direct it into the appropriate stormwater network, helping prevent ponding and reducing the risk of water entering buildings.
Every property is different, which is why our team assesses the unique conditions of each site before recommending a solution.
Hidden Drainage Issues Could Be Making Things Worse
Many drainage problems are not immediately visible from the surface. Blocked pipes, collapsed drains, tree root intrusion, and damaged stormwater lines can all contribute to poor drainage performance.
That’s where CCTV Drain Inspections become invaluable.
Using advanced camera technology, our technicians can inspect underground drainage systems without excavation. This allows us to accurately identify:
Blockages and obstructions
Broken or collapsed pipes
Tree root intrusion
Incorrect pipe falls
Structural defects
Stormwater connection issues
By identifying the exact cause of a drainage problem, we can recommend the most effective and cost-efficient solution.
Protect Your Property Before the Next Storm
Heavy rainfall events are becoming increasingly common throughout New Zealand. Waiting until flooding occurs can result in expensive repairs and unnecessary stress.
Whether you’re experiencing standing water on your driveway, recurring flooding, overflowing drains, or simply want peace of mind before the next weather event, Drainage NZ has the expertise and equipment to help.
From professional surface water management solutions to comprehensive CCTV drain inspections, our team can identify the problem and deliver a long-term solution that protects your property.
Need Help With Drainage Issues?
If today’s rain has highlighted drainage problems around your property, contact Drainage NZ today. Our experienced drainage specialists can assess your site, identify the cause of the issue, and provide practical solutions that keep your property dry and protected all year round.
Homeowners in Auckland should think about drain mainenance as summer draws near. As warmer weather approaches, getting your drainage system ready now will help avoid problems that often occur as the temperature rises. Here are several reasons why summer is the best time of year to do drainage work, from the advantages of proactive inspections we would discuss things in details.
How Seasonal Changes Affect Drains:
The drainage pipes may shrink during Auckland’s warmer months. In fact, this natural contraction has the potential to tear pipes apart, leaving gaps or fractures that, over time, may result in leaks, obstructions, or even more serious drainage problems. In order to make sure your drainage systems are prepared for the next dry and rainy seasons, summer is a crucial time to inspect and maintain them.
Now is the moment to check more closely if your house has ever had even the smallest drainage problem. Compared to the wetter winter months when water or mud may hide the indications of damage, any problems are simpler to identify and resolve during the dry summer months. Ignoring these problems might eventually result in expensive repairs over time.
CCTV’s Function in Drain Maintenance:
A CCTV drain inspection is one of the best methods for identifying drainage problems. Professionals can locate obstructions, holes, or other problems in your drainage system using a tiny camera and CCTV technology, all without the need for digging up anything. Homeowners can find and fix drainage problems quickly and affordably with CCTV drain inspections.
Using CCTV cameras to examine drains is considerably simpler in dry weather since they provide a sharper image of the interior of the pipes, free from obstructions like dirt or too much water. It is best to schedule a CCTV drain inspection during Auckland’s warmer months if you face any problems.
Typical Summer Drainage Problems to Look Out for
As the weather heats up in Auckland, some drainage problems are more likely to arise. The following are some typical issues that CCTV inspections may identify:
1. Cracks or Shifts in Pipes: Pipes may move slightly as a result of soil contraction, which may cause breaks or misalignment. Even minor changes that may potentially lead to more serious issues might be found with a CCTV inspection.
2. Root Intrusion: During the dry months, trees and plants look for moisture, which may cause roots to enter pipelines and clog them. You may identify root incursions early on before they result in obstructions by using CCTV.
3. Blockages from Debris: Summertime might bring severe rains on occasion, but the dry season is perfect for inspection. By removing any obstructions immediately, you can make sure your drainage system is ready to withstand sudden downpours.
Why a Drain Check-Up Is Ideal in the Summer
Effective drain inspection is sometimes hampered by winter rains. CCTV drain inspections are simpler to do and often provide better results in the summer, when there is less water in the ground. You will get a clear picture of the condition of your drainage system if you have an inspection done right away. If repairs are required, you may take care of them quickly and affordably, avoiding more significant problems when Auckland’s rainy season resumes.
Homeowners’ Guide to Do-It-Yourself Drain Maintenance
There are a few things you can do to keep your drains in good condition throughout the summer, even though a CCTV inspection may assist in spotting problems. Here are some tips for maintaining the health of your drainage system:
1.Clear the outside gutters and drains: Get rid of any leaves or debris that could have accumulated throughout the winter. During summer storms, clogged drains and gutters may cause flooding and water damage.
2. Check Drain Covers and Grates: Verify that drain covers are firmly in place and undamaged. By preventing bigger material from getting into the drains, these covers lessen the chance of blockages.
3. Use a Natural Drain Cleaner: A natural drain cleaner, such as vinegar and baking soda, will assist remove small obstructions without damaging your pipes.
Schedule a CCTV Drain Examination:
Homeowners in Auckland should take advantage of the summer months to fix any possible drain problems before they become worse. You may save time and money in the long run by scheduling a CCTV drain inspection to identify minor issues before they become more serious and need expensive repairs. The dry season of summer is a great time to inspect and maintain the condition of your drainage system.
At Master Drainlayers, you can be confident that our employees are qualified and authorized to do the service, and our work is guaranteed. We take satisfaction in the quality of our work, despite the fact that it is buried and no longer visible. Drainage NZ have over 20 years of drainage experience! We are experienced, qualified and have all the toys to do anything that relates to drainage in New Zealand.
We’ve found a drainage problem and need your help to fix it!
Have you received a letter from Watercare stating the above? Don’t panic! Please read through the following information first. Drainage NZ have developed affordable solutions which could save you thousands in separating your sewer and stormwater drainage (Cross Connections) .
Your Watercare letter may look like the following letter one of our most recent clients have received.
Sample:
Dear Owners,
Re: Private drainage investigation results for your propertySite address: XXXYYY REF: 123XXVV
Recently your private wastewater and stormwater drainage was inspected as part of a joint investigation programme between Auckland Council and Watercare to improve our stormwater and wastewater networks, and the water quality of Auckland’s streams and beaches.
In light of the COVID-19 pandemic, Council is aware that this has affected many of our circumstances and understands this can place extra pressure on people, businesses and whānau. Council in good faith asks that at you seek to remedy the following drainage issue that has been identified.
This investigation has identified the following drainage issue on your property:
• A cracked, damaged, or unsealed pipe or inspection point.
We carried out a smoke test and Drain CCTV in your area and found smoke coming from the ground directly above the (stormwater/wastewater) private pipe or inspection point. This means the (stormwater/wastewater) pipe or inspection point is likely to be in poor condition, for example, cracked, damaged, or unsealed. Please arrange to have this repaired. One of the ways to do this is to contact a registered plumber or drain layer to investigate and fix the issue.
Please find enclosed with this letter a copy of your private drainage inspection record for your property. We have also included a leaflet that explains why fixing your drainage issue is so important.
What do you need to do?
As a property owner, you are responsible for ensuring that stormwater from your property does not enter the wastewater network and that wastewater does not enter the stormwater system. You can find a registered plumber or drain layer at www.pgdb.co.nz.
Please email evidence that the necessary repair work has been completed or underway to proactivecompliance@aucklandcouncil.govt.nz by XX 2023. This could include the following information:
• record of works undertaken by your plumber/drainlayer; or
• photographs of the repair work with measurements.
We will continue to look for ways to help our customers negotiate these difficult times and if you have any concerns or queries, please don’t hesitate to contact me using the email detail above, we will do our very best to work with you.
We would like to thank you for doing your part to reduce overflows and improve the water quality of Auckland’s streams and beaches.
In these unprecedented times we hope you continue to prioritize your health and the health of those around you, stay healthy and safe.
The letter includes a PDF attachment which we have broken down for you into sections.
We recently visited your property to:
• Check whether your gully traps, downpipes and spouting were draining into the right place and are in good condition.
• Look for areas where big puddles or flooding could occur and drain into the wastewater network.
As a result of our visit, we have identified a drainage issue on your property that is allowing stormwater to enter the wastewater network or vice versa. This is a major contributor to wet-weather
overflows and poor water quality.
Why is it important to fix this?
Problems with private drainage are a major contributor to wet-weather overflows and poor water quality. Wet-weather overflows occur when the volume of stormwater entering our wastewater pipes exceeds their capacity. When this happens, diluted wastewater can overflow, polluting people’s properties and Auckland’s streams and beaches.
Why are overflows a problem?
• They can affect your health and your family’s health
• They can pollute properties, our streams and beaches.
Reducing wet-weather overflows and improving water quality Working together to improve the water quality of streams and beaches in Auckland.
Wet-weather overflows and incorrectly connected or damaged pipes can affect people’s properties and pollute our streams and beaches. Working together to improve the water quality of streams and beaches in Auckland Why is it important to fix this? Problems with private drainage are a major contributor to wet-weather overflows and poor water quality. Wet-weather overflows occur when the volume of stormwater entering our wastewater pipes exceeds their capacity. When this happens, diluted wastewater can overflow, polluting people’s properties and Auckland’s streams and beaches.
Why are overflows a problem?
• They can affect your health and your family’s health
• They can pollute properties, our streams and beaches
If you are a property owner, you are responsible for ensuring that storm water from your property does not enter the wastewater network and wastewater does not enter the storm water network.
As part of our region-wide programme to reduce the volume of storm water entering the wastewater network, we’re inspecting and testing the public wastewater and storm water network and private property drainage across Auckland.
We’re also working closely with Auckland Council to identify and investigate issues that consistently impact the health of our local waterways and beaches. We’re developing and implementing strategies to manage wastewater and storm water in the long-term: accommodating growth., reducing wet-weather overflows and improving water quality. Together, we can improve the health of our local waterways, streams and beaches.
Landscaping and paved areas
Stormwater can build up quickly on these surfaces during heavy rain. To avoid it flowing into gully traps or wastewater pipes, drainage in these areas should be directed into the storm water network.
Private pipes
All private drainage pipes must be correctly connected so wastewater and stormwater drain into the right place. It’s also important to fix any wastewater pipes on your property that are old, broken or have roots growing into them. Water can seep through the ground into damaged pipes and enter the wastewater network.
Wastewater manholes
During periods of heavy rain, a sudden increase in stormwater flowing into the wastewater network from properties can result in diluted wastewater overflowing from manholes and elsewhere in the network.
Gully traps
Wastewater from your kitchen, bathroom and laundry exits your home through a gully trap, which is a basin in the ground. All houses have at least one gully trap against an outside wall. They protect your family’s health by ensuring that, in the event of a blockage, wastewater will overflow from the gully trap and not back inside your home. They also prevent foul air escaping from your wastewater pipes. It is important to ensure your gully trap is raised off the ground and covered by a grate to prevent stormwater and other foreign matter entering the wastewater Network.
How can Drainage NZ assist with your crossover compliance warning?
Watercare Services Limited began smoke testing drains in Auckland, New Zealand, around 2011. This method is used to identify leaks, illegal connections, and faulty pipes in the wastewater network by pumping non-toxic smoke into the system and observing where it escapes. This helps Watercare to maintain and improve the efficiency of the wastewater infrastructure by pinpointing issues that need a drain repair or replacement Drainage NZ has been involved with resolving these cross connections ever since!
If you have received a letter such as the above, contact us for solutions that will not cost you a fortune.
Checkout the video below. Basement flooding can cause big problems for homeowners, from damage to health issues. Luckily, spotting the early signs of potential basement flooding can help you act before it’s too late.
Whilst in most cases flooding can be predicted, often and especially with the increase of rainfall here in New Zealand, flash floods are becoming more common. Homes that have never flooded before are experiencing first-time events. Why is that and is there a way to identify whether your home could be next?
Unlike European countries, when we refer to a “basement” here in New Zealand, we refer to any area of the house that is below the outside ground level.
If you can identify cracks in the concrete or block walls, it is very likely this is the effect of water finding its way into areas it shouldn’t.
Let’s review some indicators.
1. Musty Odor
If your basement starts to smell musty and damp, it may be a sign of excess moisture and potential water infiltration.
2. Cracks in the Foundation
Inspect your basement’s foundation for visible cracks. These cracks can let water seep in and eventually lead to flooding.
3. Water Puddles Outside
Water collecting around your home’s foundation after rain can find its way into your basement. Proper drainage and grading can help prevent this.
4. Damp or Stained Walls
Damp or stained walls in the basement indicate moisture getting in. These stains can worsen and suggest possible flooding.
5. Blocked or Overflowing Gutters
Clogged gutters can cause water to overflow and enter your basement. Keep your gutters clean and well-maintained.
6. Sump Pump Problems
If your sump pump isn’t working correctly, it can’t remove water effectively. Regularly check your sump pump to ensure it’s in good working condition.
7. High Water Tables
Areas with high water tables are more prone to basement flooding. Understanding local groundwater levels can help you prepare better. Be proactive and check your home’s LIM report to identify whether your home is subject to Flow Paths or Flooding zones. If this is the case, Drainage NZ can help you be prepared for such an event before it’s too late.
9. Rising Utility Bills
Sudden increases in water and energy bills may indicate hidden leaks or water infiltration that could lead to flooding.
10. Water Stains or Peeling Paint
Concrete block calcification, water stains or peeling paint along basement walls suggest water intrusion. We can investigate the source to prevent this. This includes treatment of block work and timber.
11. Unusual Sounds
Strange noises like gurgling drains can be early signs of drainage blocking, which can lead to basement flooding if not addressed. Get drain unblocking service right away to avoid extensive damage.
12. Condensation on Windows
Excess condensation on basement windows can indicate high humidity, contributing to basement moisture and potential flooding.
13. Changes in Landscaping
Noticing major changes in your landscaping, like slopes toward your home, may direct water toward your foundation, increasing the risk of basement flooding.
14. Weather Patterns
Stay informed about local weather forecasts, especially during heavy rain or snowmelt periods, which can increase the risk of flooding.
15. Health Symptoms
Many underestimate the effects of long term exposure to non visible water problems.
Increased allergies or respiratory issues can indirectly indicate moisture and mould growth in your basement, often linked to flooding or water ingression. Recognizing these early warning signs is the first step in preventing flooding or long term damage. Regular checks, maintenance, and swift action are vital to safeguard your home from this costly and stressful issue. By staying alert and taking necessary precautions, you can significantly reduce the risk of basement flooding and its related problems. If you need help with assessing these early signs, don’t hesitate to contact us!
Watercare’s gigantic Tunnel Boring machine, known as Hiwi-i-te-Rangi, has recently reached a noteworthy achievement during its excavation of the Central Interceptor Tunnel. It has successfully achieved the halfway point of its 14.7-kilometre journey to central Auckland, marking this remarkable feat with a breakthrough into a shaft at May RD in Mount Roskill.
The Central Interceptor project is hailed as the largest wastewater infrastructure endeavour in New Zealand’s history, holding the promise of seriously addressing wet weather overflows into waterways and the Waitemata Harbour. Furthermore, the tunnel will intersect with two link sewers connecting the Mangere Wastewater Treatment Plant and Grey Lynn.
Amidst the jubilant cheers of construction teams, Shayne Cunis, the Executive Programme Director of Watercare Central Interceptor, announced the breakthrough of the cutter head, with a diameter of over five meters, through a 69-meter-deep shaft wall. Cunis emphasized that despite the considerable challenges faced, this breakthrough signifies a crucial moment in the project’s progress.
Cunis urged everyone to take a moment to appreciate this significant achievement, emphasizing that the project remains on track to meet its planned 2026 completion date, despite obstacles such as COVID-19 lockdowns, closed borders, global shipping delays, and adverse weather events. The top priority remains ensuring the safe delivery of the project.
According to Cunis, one of the most thrilling moments in the project journey thus far was the 2022 crossing of Manukau Harbour, spanning from Mangere Bridge to Hillsborough. Underwater tunnels are a rarity in New Zealand, and this 1500-meter section was completed in less than 11 weeks.
The Central Interceptor project has reached several milestones. Following the completion of the undersea bridge in December 2022, the first link sewer, responsible for collecting flows from Mount Roskill and Blockhouse Bay, was finished in March of this year. Construction has also commenced on a second link sewer, set to be built in two segments, intersecting the main shaft at Wairere Avenue in Mount Albert.
Cunis extended his appreciation to the construction partners of Ghella Abergeldie JV, as well as the dedicated teams from Jacobs, AECOM, Delve Underground, Watercare, and the subcontractors. He acknowledged their tremendous efforts in ensuring the project’s successful delivery.
Francesco Saibene, the Project Director of Ghella Abergeldie JV, also commended his tunnelling team for their hard work, emphasizing that reaching the halfway point is a moment of celebration for all involved.
Meanwhile, significant progress is being made on the nearby Mangere Pump Station project, where six pumps and inflow pipes are being installed to facilitate the transfer of flows from the main tunnel to the treatment facility for processing.
The planned timeline includes completing both the connection sewers and Section 1 of the primary tunnel, stretching from May Rd south, by the middle of 2024. Initiating the first segment will relieve strain on the aging Western Interceptor.
Cunis emphasized that resilience has consistently been a primary motivator for this project, alongside the objectives of accommodating future expansion and delivering environmental benefits. Once Section 1 becomes operational, Watercare’s operations teams will have the opportunity to perform essential maintenance on the Western Interceptor.
These upgrades are exciting for all drainlayers in the Auckland area. As our infrastructure grows more and more exciting drainage developments will take place. Drainage NZ specialize in Public and Council drainage works, if you have a project planned, why not have us tender for you.
We do Driveway and Garage Channels. Domestic and Commercial.
Driveway channeldrains are also called trench drains, drainage channels, or linear channels. These are linear drainage systems that are frequently used and commonly installed to immensely reduce the amount of excess water in your driveway, around swimming pools, decks & retaining areas, pedestrian areas, and more. This type of drainage system provides efficient management of surface water.
Materials used in channel drains
Plastic Channel Drains – Plastic or polypropylene drains offer the best balance between ease of use, shipping, and costs. It’s proven high-performance even if it is considered fragile or not very strong. This material has many advantages, including the following:
non-toxic
odor-free
lightweight
It does not absorb water. Resistant to temperature changes.
Unaffected by solvents, acids, and wear.
Concrete Channel Drains – are more robust and have higher chemical resistance. Concrete channels have the benefit of being cost-effective compared to other materials on the market. It also has a high resistance to compression. Compared to others, the only disadvantage this material has is that it is a weighty material.
Grating Material – Grating is commonly used in commercial locations. It’s the most efficient way to gather overflows, but the space at the top is installed so that people will not get their feet caught in the drains. Grating styles are called longitudinal slots, perforated gratings, mesh gratings, horizontal slots, solid gratings, heel-proof gratings, and diagonal slotter gratings.
Weight load classes
When selecting channel drainage, it’s crucial that you consider the weight-loading requirements before deciding which system to place in a specific area. Loading requirements are categorised into six standard classes, which are:
A15 – Light duty, pedestrian areas; gardens, patios, and driveways
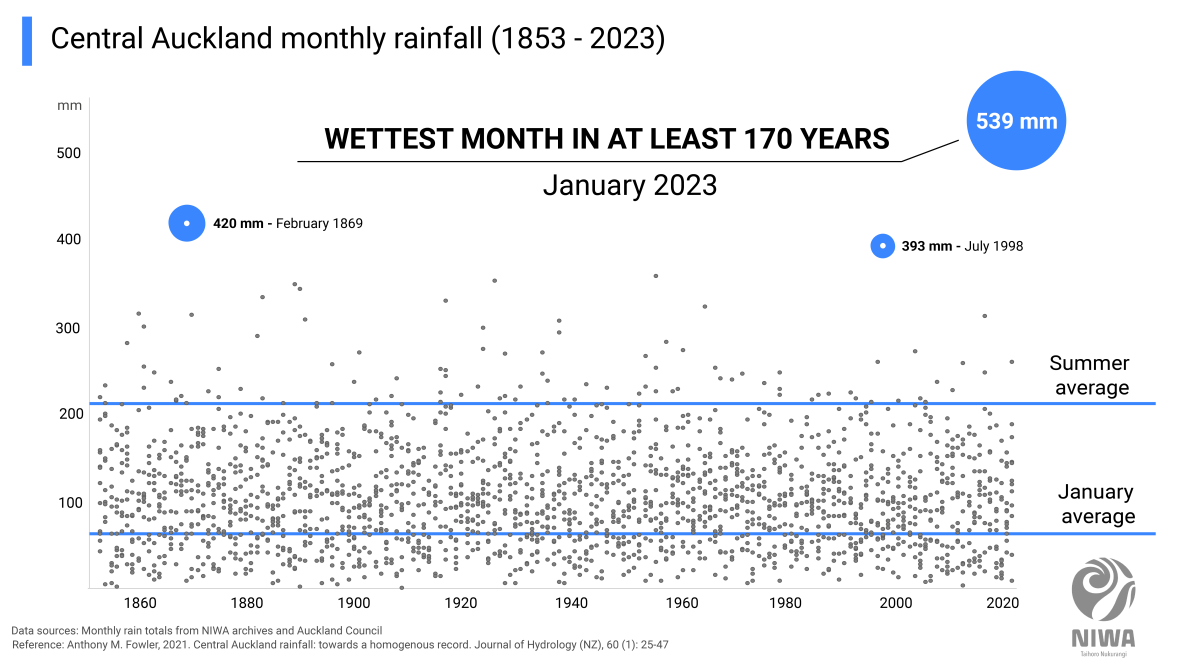
The weather in New Zealand is changing. More and more properties are feeling the effect of our record rain fall as storms like Gabrielle become the norm in this decade. In fact, Aucklanders suffer the wettest month in history! Article Here by NIWA.
This ultimately means that many conventional methods of managing stormwater in the Auckland area may need to be reassessed, revalued and improved.
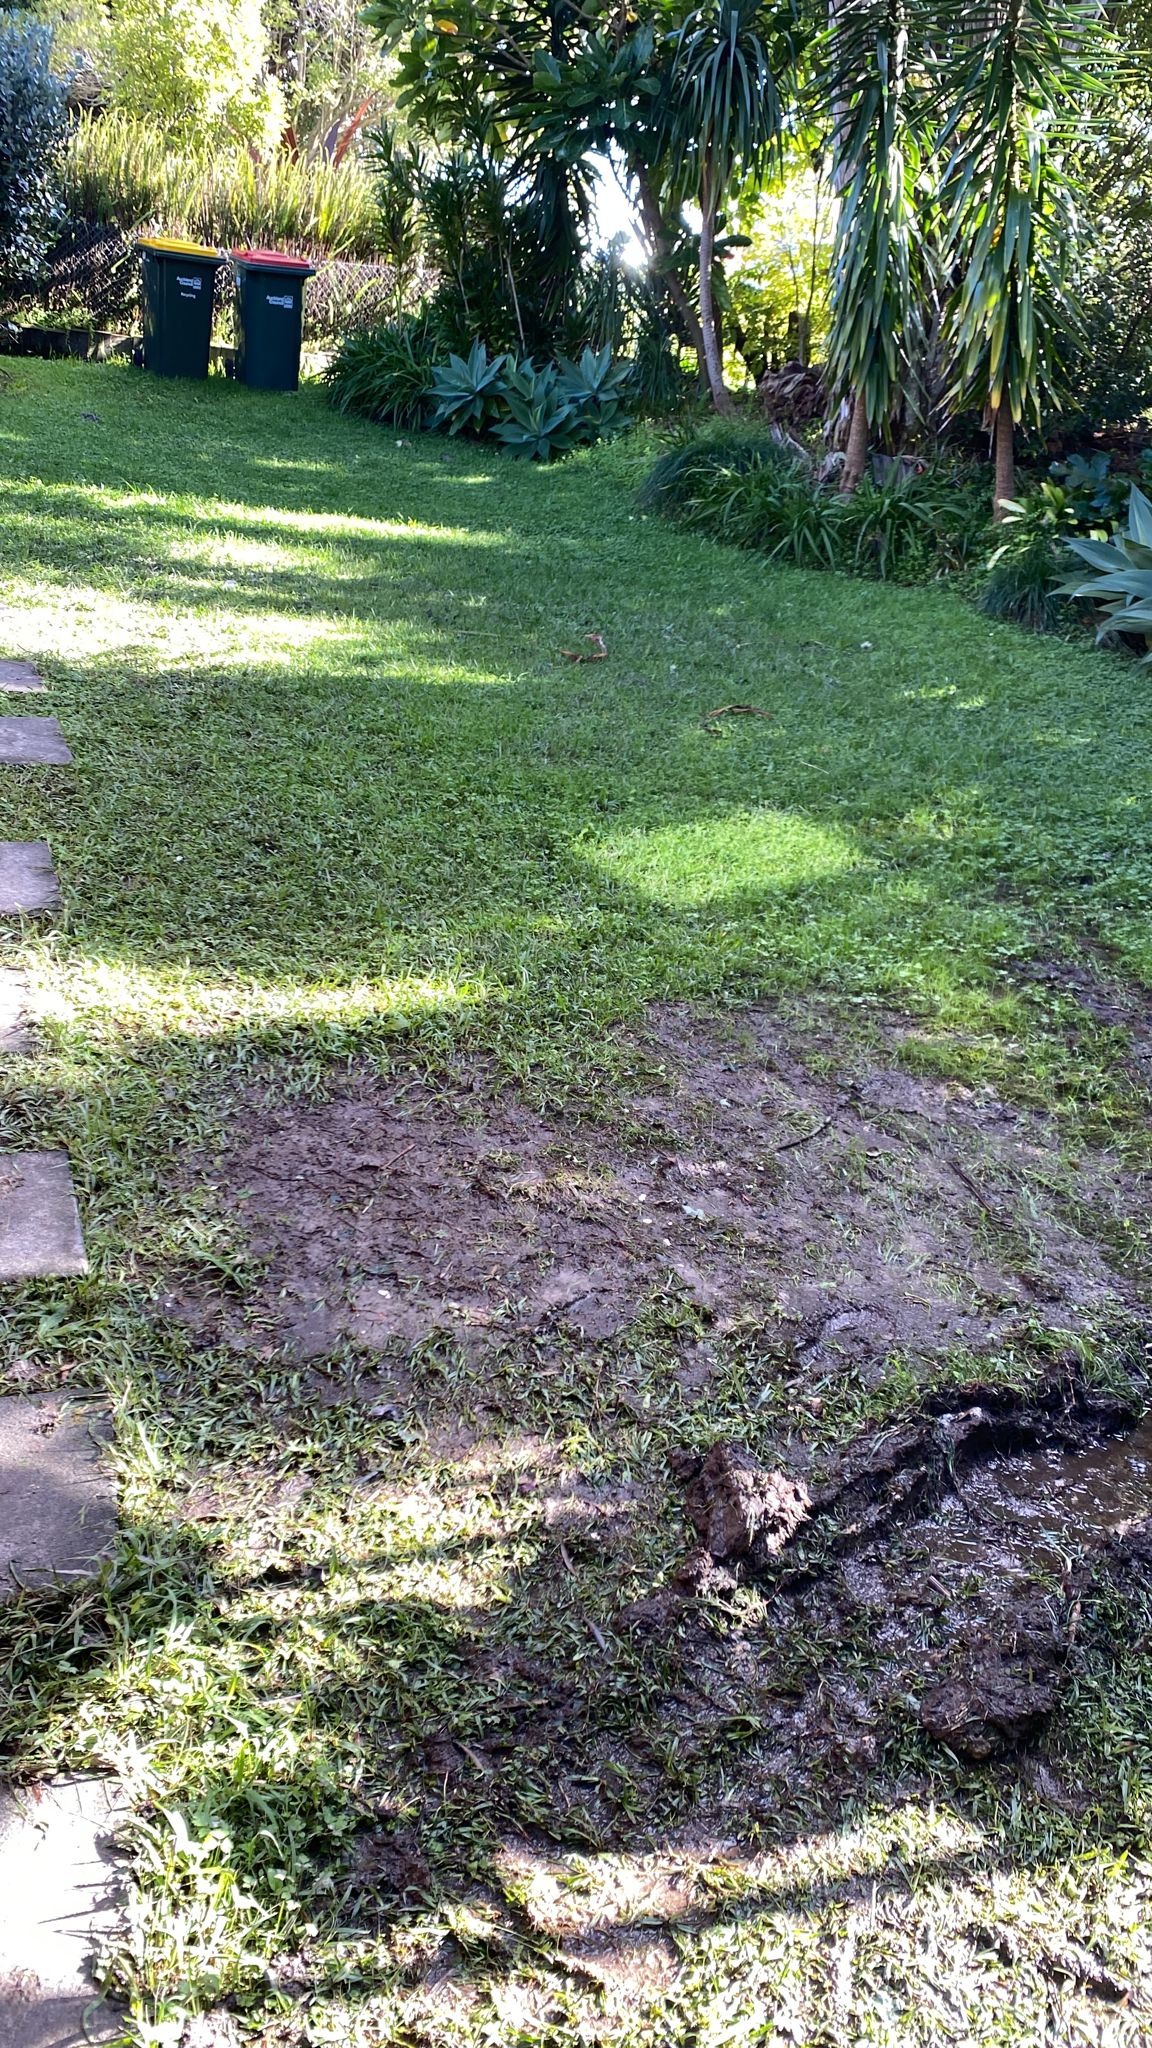
This of course starts with our Public Systems that are already struggling with the volume of water being managed. Our overwhelmed Stormwater systems are also affecting our Sewer system in the Auckland areas. During heavy rains, this leads to overflowing gully traps and sewage flooding onto lawns and even into properties.
Watercare and council have been tackling cross connection issues for years using methods such as smoke but as they continue to successfully separate stormwater and sewer they are faced with the consequences of this ongoing extreme wet weather.
In the images below, Watercare is testing a suspected private line to ensure SW and SS are not connected together. The apply smoke to the sewer line and if smoke exits the stormwater then there is evidence that the two are connected. It is the home owner’s responsibility to remedy the problem.
Whilst planning and action is underway, it takes time for our councils and government to improve NZ’s infrastructure and in the meantime, where does that leave you as a property owner?
If you property is affected by one of the following scenarios, then you will also be affected by the record rain. Especially homes that were built pre 2000.
Scenarios:
If a portion of your property is below ground. E.g. The ground outside is higher than the floor inside. The more sides of the property below external ground level, the more flood prone the property is.
Your property is located down the hill or down a shared driveway. The saying goes, “The property down the hill pays the bill”. Subsoil Solutions required.
Your property operates a charged water discharge system where downpipes are sealed pushing water upstream.
Your stormwater discharge is going into a soakhole. Most likely installed in the 70s and most likely never serviced.
You don’t have a public connection and your SW and SS is combined integrating a Buchan trap.
Your Garage floor is the lowest point and does not offer a step up.
You rely on external channels and residential cesspits that are not doing a great job.
If any of the above applies to you, you have come to the right company to assist with solutions that are not only permanently effective but also affordable.
Thanks to our expertise, over 100 homes in the Auckland area alone will never flood again!
Our engineered solutions are unique and designed to give you confidence. Give us a ring on 0800 DRAINLAYER and solve your flooding problems once and for all.
We also provide insurance report and provide building inspections services to identify flood risk prior to buying a property.
Current Jobs, Drainage NZ is providing solutions for:
Discovering a leaking house can be a disheartening experience. You can spend hours searching for the source of the leak only to come up empty-handed. Unfortunately, water leaks are a common problem in many homes, especially those with basements. Fortunately, there are steps you can take to identify and fix water leaks in your home. This blog will discuss the common causes of water leaks in homes, how to fix them, and how to prevent further leaks. Read on to learn more about how to solve the mystery of a leaking house.
What to Do When You Discover a Leaking House
If you discover that your house is leaking, the first thing to do is assess the damage. Take note of any visible signs of water damage, including water stains on the walls and ceilings, mould, and warped floors. If you suspect a water leak, locate the source of the leak as quickly as possible. This will help you determine the best way to address the problem.
The most important thing to remember is that water leaks can cause serious damage if left unchecked. It’s essential to act fast to avoid costly repairs down the line. If you’re concerned about the safety of your home, contact a professional to inspect the area and make the necessary repairs.
What Causes Water Leaks in Your House?
There are a variety of factors that can cause water leaks in your house. The most common culprit is ground water entering a home when it is buried underground and having nowhere else to go but inside your home.
In some cases, the source of the leak may be difficult to pinpoint. If this is the case, it’s best to call in a professional to help you identify the source of the leak. A professional can quickly pinpoint the source of the leak and make the necessary repairs.
Identifying the Source of the Leak
The first step in solving the mystery of a leaking house is to identify the source of the leak. This can be a tricky process, as the source of the leak may not be immediately apparent.
Start by looking for any visible signs of water damage, such as water stains on the walls or ceiling, mould, or warped floors. If you can’t find any obvious signs of a water leak, it’s time to start looking for more subtle signs.
Check for any unusual smells or sounds, such as a musty smell or gurgling noises. You may also want to check for any signs of moisture or dampness in the walls, floors, and ceilings. If you can’t find any visible signs of water damage, it’s time to call a professional. A professional will be able to pinpoint the source of the leak and make the necessary repairs.
Common Causes of Water Leaks in Basements
Basements are one of the most common areas for water leaks. This is because basements are usually the lowest point in the home, making them susceptible to flooding.
The most common cause of water leaks in basements is poor drainage. If your basement has no means of diverting ground water away from the home then it will enter the home instead. Water can easily seep in and cause damage.
Drainage Subsoil Solutions
If the source of the leak is poor drainage, you may want to consider installing a drainage subsoil system. A drainage subsoil system is designed to redirect water away from the house, preventing it from seeping in and causing water damage.
The drainage subsoil system consists of a network of pipes and trenches that are installed around the perimeter of the house. The pipes and trenches are designed to collect and divert water away from the house, preventing it from seeping in and causing damage.
This type of system is relatively lengthy and expensive to install but is the most effective way to prevent water damage long-term. If you’re concerned about the safety of your home, it’s best to call in a professional to install the system for you.
How to Prevent Future Leaks
Once you’ve fixed the source of the leak, it’s important to take steps to prevent future leaks. Whilst all the trenches are open around the home, the drain layers would seal up any obvious entry points to the home such as cracked bricks or holes in the walls. The drain layers also apply 2 coats of waterproof paint as a precaution to prevent any more water from entering the home.
DIY or Hire a Professional?
When it comes to fixing a leaking house, it’s important to decide whether you’ll do the repairs yourself or hire a professional. While it’s tempting to attempt DIY repairs, it’s usually best to call in a professional. This is because water leaks can cause serious damage if left unchecked. A professional will be able to quickly identify the source of the leak and make the necessary repairs.
If you want to get Drainage NZ to look at your house to see what can be done to stop the water form getting in, they offer a free consultation. During the consultation, they’ll inspect your home and provide you with a detailed report on the best way to address the problem.
It’s no secret that our homes are often the source of many of our biggest headaches. Whether it’s broken pipes, blocked drains, or simply an area of the house that needs a bit of TLC, we often find ourselves searching in the dark for a solution. But what if there was a way to quickly and accurately identify the issue and get it fixed? Well, that’s where a CCTV inspection comes in.
Introduction to CCTV Inspections A CCTV inspection is the use of a closed-circuit television camera to inspect a home’s plumbing and drainage system. This type of inspection allows professionals to “see” inside the pipes and pinpoint any potential problems. It’s an invaluable tool for plumbing and drainage professionals and homeowners alike, as it allows for quick and accurate diagnosis of any issues.
The process is simple. A CCTV camera is inserted into the pipes and moved along the length of the pipe. As it moves, it takes pictures and videos of the interior of the pipe, allowing the technician to identify any potential problems. This information is then relayed back to the technician, who can then determine what needs to be done to fix the problem.
What Can a CCTV Inspection Reveal? A CCTV inspection can reveal a multitude of problems. From broken pipes to blocked drains, a technician can pinpoint the exact problem and provide a solution. It can also help to identify any potential problems before they become an issue. This is especially helpful in older homes, where it can be difficult to identify any potential issues without a thorough inspection.
Some of the most common issues that a CCTV inspection can reveal include:
Blockages in the pipes Leaks or breaks in the pipes Root intrusion Corrosion Structural damage to the pipes Cracks or holes in the pipes
How to Prepare for a CCTV Inspection Preparing for a CCTV inspection is relatively easy. Before the technician comes to inspect the property, it’s important to ensure that all of the necessary access points are open and easily accessible. This includes manholes, cleanouts, and other access points.
It’s also important to make sure that the area around the pipes is clear, as this will help the technician to get a better view of the pipes. If there is any debris or obstructions in the way, it’s important to remove them before the technician arrives.
Finally, it’s a good idea to make sure that the pipes are clean. This can be done by flushing them out with water and running a snake through the pipes if needed. This will help to ensure that the technician can get a clear and unobstructed view of the pipes.
What to Look Out For During the Inspection During the inspection, the technician will be looking for a variety of different things. They will be looking for any signs of damage or corrosion, as well as any blockages or root intrusions. They will also be looking for any signs of leaks, as these can be extremely dangerous and need to be fixed as soon as possible.
The technician will also be looking for any structural damage to the pipes. This can include cracks, holes, or breaks in the pipes. This is especially important in older homes, as these types of issues can often go unnoticed and can lead to serious problems down the line.
Common Problems Revealed by CCTV Inspections The most common problems revealed by CCTV inspections are blockages, leaks, and root intrusions. Blockages are caused by a build-up of debris or other materials in the pipes, which can block the flow of water. Leaks can be caused by a variety of things, including broken pipes, corrosion, or even structural damage. Root intrusions are caused by tree roots growing into the pipes, which can cause blockages and damage the pipes.
How to Fix Common Problems Revealed by CCTV Inspections After a CCTV inspection, the technician will be able to identify any problems and recommend the best course of action. In most cases, the technician will recommend one of two options: water blasting or unblocking.
Water blasting is a process where high-pressure water is used to flush out any blockages or debris from the pipes. This is usually the most effective option for blockages and is also relatively quick and easy.
Unblocking is a more involved process, where the technician uses specialized tools to remove the blockage from the pipes. This process is usually used for more serious blockages, such as root intrusions.
The Benefits of Using a CCTV Inspection There are a number of benefits to using a CCTV inspection. First and foremost, it can help to identify any potential problems before they become an issue. This can save homeowners a lot of time, money, and stress.
A CCTV inspection can also save homeowners money in the long run. By identifying any issues before they become serious, homeowners can save money on repairs and avoid any costly problems down the line.
Finally, a CCTV inspection is a great way to help maintain the health of your home’s plumbing and drainage system. By identifying any potential problems and addressing them quickly, homeowners can help to ensure that their plumbing and drainage system stays in good condition for years to come.
Important Considerations When Choosing a CCTV Inspector When choosing a CCTV inspector, it’s important to consider a few different factors. First and foremost, it’s important to make sure that the inspector is qualified and certified. This will ensure that the inspection is performed correctly and that any potential problems are identified and addressed quickly.
It’s also important to consider the cost of the inspection. CCTV inspections can be expensive, so it’s important to shop around and find the best deal. It’s also important to make sure that the inspector is experienced and knowledgeable, as this will ensure that the inspection is thorough and accurate.
Tips for Maintaining Your Home After a CCTV Inspection Once the inspection is complete, it’s important to take steps to maintain your home’s plumbing and drainage system. This includes regular inspections of all access points, such as manholes and cleanouts. It’s also important to make sure that all pipes are clear of debris and that any minor repairs are addressed quickly. Finally, it’s important to make sure that all pipes are properly insulated to help prevent any issues in the future.
Conclusion A CCTV inspection is an invaluable tool for homeowners and drainage professionals alike. It can help to quickly and accurately identify any potential problems and allow for quick and effective remedies. It can also help to maintain the health of your home’s plumbing and drainage system, saving you time and money in the long run.
If you’re looking for a reliable and experienced CCTV inspector, then look no further than Drainage NZ. With years of experience and a commitment to excellence, they are sure to get the job done right. Get Drainage NZ to do the next CCTV job at your house!
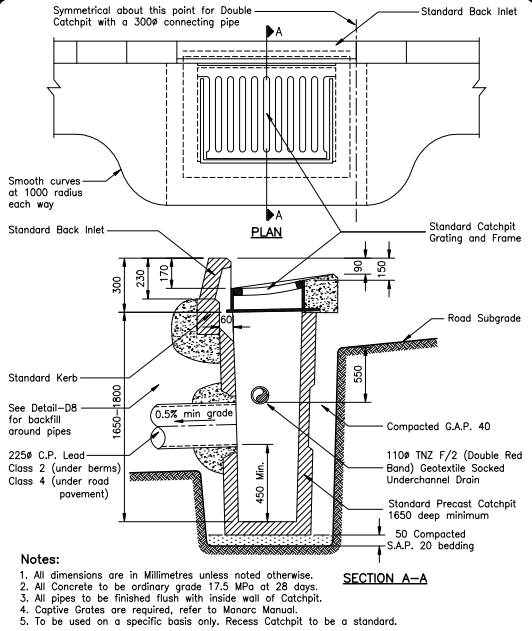
A cesspit or catchpit is a drainage system used primarily in stormwater management. Whether it is sewerage or stormwater, a cesspit is designed to prevent blockages and water contamination in a drainage system. A cesspit is a chamber that allows debris and sediments to settle to the bottom of a pit. For this reason it is advisable to regularly maintain your cesspit by emptying and cleaning at least once a year.
Why do you need a cesspit?
A cesspit is typically found upstream of a drainage system. This way the cesspit can collect all debris before it enters public or private stormwater pipes.
Cesspits are most commonly found in gardens, driveways or roadways. These environments typically collect large quantities of debris and sediment which if allowed through would cause blockages in a public drainage system. A blockage could cause flooding, water to return back up a pipe or worse damage property. Therefore a cesspit is vital when managing surface water in any of these environments.
By law all channels and subsoil drainage must flow into a cesspit to ensure no debris can flow into the private or public stormwater lines. For example, a driveway channel may be a vector for debris to collect, and so all water must be filtered before it can be discharged into the stormwater line.
How does a cesspit / catchpit work
Basically, a cesspit works by providing a sump where sediment and debris can fall and collect. Water overflows at the top level of the cesspit leaving debris behind at the bottom of the pit. The clean water then exits through the outlet pipe, which sits just lower than the inlet pipe.
To protect the outlet pipe against potential floating debris, a baffle can be fitted to the outlet. This can help filter leaves and twigs, stopping them from entering the pipe.
Because silt, sediment and debris build up in the sump of the cesspit, regular maintenance and cleaning of the cesspit is required. Typically the average cesspit should be cleared out annually to prevent a build up of debris. Such a build up could cause the cesspit to become ineffective, increasing the likelihood of damage from unmanageable water.
Types of cesspits
The most common form of catchpit is a roadside catchpit. Catchpits can be found intermittently alongside Auckland roads. What is unique about these types of catchpits is their design. Roadside cesspit openings must not allow objects greater than 100mm in dimension to pass through. Openings must also be small enough to prevent sizable debris from entering the system that may cause damage. These cesspits are typically larger than ones found on residential property. Under New Zealand building code these cesspits are known as a type 2 surface water sump.
A type 1 cesspit is no larger than an office paper bin. These cesspits are commonly used in residential applications such as in a driveway or garden.
There are many different names for a cesspit, such as:
Catchpit
Bubble up chamber
Receiving chambers
wet chambers
Dry chambers
Regardless of the name, the principles are the same. Incoming water is filtered to remove contaminants before entering a larger drainage system. This now clean water can then be confidently reused, recycled, or safely discharged into our oceans or environment.
Cesspits come in a variety of materials. The physical sump is typically made of:
Concrete
Polyethylene plastic
The top grate of a cesspit is typically made of iron. Iron grates are extremely durable and heavy. This prevents the grate from blowing away in strong weather.
With the increasing popularity of bicycle lanes, a newly designed cesspit finish is becoming more common. This new design is a flat stainless steel grate. Unlike the normal curved iron grate, this cesspit finish is designed to prevent accidents on bikes and scooters. More traditional curved grates can act like a pothole, dismounting commuters off their bike.
Maintenance
Because a cesspit is a static installation designed to filter stormwater it can quickly become full. If Debris and sediment pile up it will cause a blockage, damage and even flooding. Therefore it is necessary to regularly maintain cesspits by clearing excess waste. Ideally this should be done yearly.
Every homeowner should be concerned whether their cesspit is functional or not. One quick test you can do at home is to look down into your cesspit. If you cannot see an outlet pipe then it most likely means your cesspit is overflowing or blocked.
We at Drainage NZ offer our own regular maintenance service. Book with us and receive annual maintenance on your cesspit. We’ll turn up at the same time every year to empty and clean your cesspit with no fuss and at a competitive price.
Give us a call on 0800 372 465 or contact us online to organise maintenance on your cesspit.